This comprehensive guide provides detailed instructions for managing user profiles, creating and administering user accounts, and additional settings to manage your account. Whether you're updating your personal profile information, changing passwords, or administering user accounts with proper role-based permissions, this guide covers all essential functions. The manual includes step-by-step processes for profile customization, multi-language settings, secure user account creation, and various settings . System administrators will find particular value in the detailed user and role management sections that ensure proper security protocols and permission structures.
Profile Settings Management
Accessing Profile Settings
The profile settings section serves as your central hub for managing personal account information, security credentials, and system preferences. This area allows individual users to maintain their account details, update authentication information, and customize their user experience according to their needs and organizational requirements.
Step 1: Locating and Accessing the Profile Menu
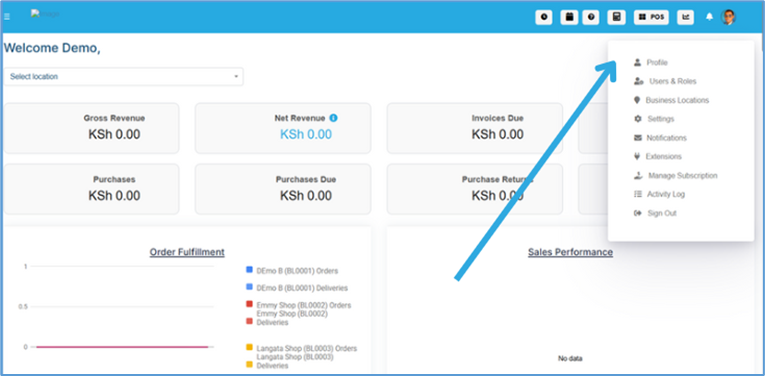
Begin by identifying the Profile Icon which is strategically positioned in the top navigation bar of your system interface. This icon typically appears as a circular avatar image, user silhouette, or initials display in the upper-right corner of your screen. The profile icon serves as the gateway to all personal account management functions.
- Locate the Profile Icon: Scan the top navigation bar, specifically the right-hand side where user-specific controls are commonly placed
- Click to Reveal Options: Single-click on the Profile Icon to trigger the dropdown menu display
- Observe Menu Options: The dropdown will expand to show various account-related options including profile settings, logout, and other user-specific functions
Step 2: Navigating to Comprehensive Profile Settings
Once the dropdown menu is active and visible, you'll need to select the appropriate option to access the full profile management interface.
- Look for the "Profile" text or link within the dropdown menu
- Single-click on "Profile" to initiate navigation to the profile management page
→ This navigation process will direct you to the main profile settings dashboard where you can manage both security credentials (password changes) and personal profile information (contact details, preferences, photo uploads) in a unified interface.
Change Password Section
The password management functionality represents one of the most critical security features of your user profile, enabling you to maintain strong authentication credentials and protect your account from unauthorized access. This section provides comprehensive password update capabilities with built-in security verification measures to ensure only authorized users can modify login credentials.
Understanding Password Security Requirements
Before beginning the password change process, it's essential to understand that the system implements multiple security layers to protect your account. The password change functionality requires verification of your current credentials before allowing any modifications, and all password fields must meet the system's security standards including minimum length requirements, character complexity rules, and pattern restrictions.
Detailed Password Update Process:
Step 1: Locating the Change Password Interface
Navigate within the profile settings page to identify the "Change Password" section, which typically appears at the top portion of the profile management interface. This section is deliberately positioned prominently due to its importance for account security and is usually enclosed in a distinct container or card layout to separate it from other profile functions.
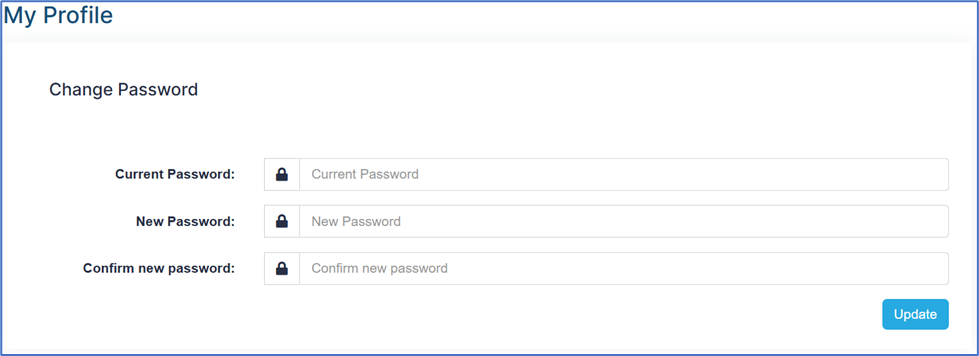
Step 2: Completing Security Verification and New Password Fields
The password change process requires careful completion of three interconnected fields that work together to ensure security and accuracy:
Current Password Verification:
- This field serves as your identity verification, confirming that you are the legitimate account holder
- Type your existing password exactly as you would during login, including correct capitalization and special characters
- The system compares this entry against your stored credentials; incorrect entries will prevent password changes
- The field typically displays masked characters (dots or asterisks) for security purposes
New Password Creation:
- This field captures your desired new password that will replace your current credentials
- Your new password must meet all system requirements including:
- Minimum character length (typically 8-12 characters)
- Mixed case letters (both uppercase and lowercase)
- Numeric digits (at least one number)
- Special characters (symbols like !, @, #, $, %, etc.)
- Avoidance of common words or personal information
⚠️ Create a unique password that you haven't used for other accounts or previous system passwords
New Password Confirmation:
- This verification field ensures accuracy by requiring you to re-enter your new password exactly
- Both new password fields must contain identical characters in the same sequence
- This double-entry system prevents accidental typos that could lock you out of your account
- Finally, click Update
Edit Profile Section
The profile editing interface provides comprehensive personal information management capabilities, allowing users to maintain current contact details, customize system preferences, and upload professional profile imagery. This section encompasses all non-security-related account information and serves as your digital identity within the system, affecting how other users see your information and how the system personalizes your experience.
Understanding Profile Information Categories
Your profile information is organized into several distinct categories, each serving specific purposes within the system. Personal details establish your identity and professional standing, localization settings customize your user experience for your preferred language and cultural context, profile imagery creates visual recognition for other system users, and additional information fields capture organization-specific data requirements that may be essential for business processes, reporting, or compliance purposes.
Comprehensive Personal Details Management:
Professional Identity Fields:
The personal details section captures essential identification information that appears throughout the system in user directories, communication records, and administrative reports.
Prefix Selection:
- Establishes professional courtesy titles and formal address preferences
- The dropdown typically includes standard titles such as Mr., Mrs., Ms., Dr., Prof., Rev., Hon., and other professional designations
- Some organizations include cultural or regional titles specific to their operational areas
- Your selected prefix appears in formal communications, reports, and official documentation
- This field can be changed at any time to reflect changes in professional status or personal preferences
First Name Management:
- Captures your primary given name as used in professional and system communications
- This name appears in user lists, email communications, and system notifications
- Should match your official identification documents for organizational compliance
Last Name (Surname) Entry:
- Records your family name or surname for complete identification
- Combined with first name, creates your complete professional identity within the system
- Other users can locate you using surname searches in user directories
- Last names are crucial for alphabetical sorting in reports and user listings
Email Address Configuration:
- Often serves as your unique system identifier and primary communication channel
- Many systems use email addresses as login usernames, making accuracy essential
- Must follow standard email format (user@domain.extension (ie .com…) with proper syntax
- Email addresses typically must be unique within the system to prevent conflicts
- All system notifications, password resets, and official communications are sent to this address
Advanced Localization and Language Settings
Comprehensive Language Support System:
The language selection feature transforms your entire user experience by adapting interface elements, date formats, number representations, and cultural conventions to match your preferred linguistic and cultural context.
Detailed Language Options:
- English: Default interface language with standard Western date/time formats and conventions
- Spanish - Español: Full Spanish interface with appropriate cultural date formats and regional conventions
- Albanian - Shqip: Complete Albanian language support including specialized characters and cultural formatting
- Hindi - हिंदी: Comprehensive Hindi interface with Devanagari script support and Indian cultural conventions
- Dutch: Full Dutch language implementation with European formatting standards and cultural adaptations
- French - Français: Complete French interface including Canadian and European variants with proper accent support
- German - Deutsch: Full German language support with proper capitalization rules and cultural formatting conventions
- Arabic - اعَرَبِيَّة: Complete Arabic interface with right-to-left text support and Islamic calendar integration options
- Turkish - Türkçe: Full Turkish language support including special characters and Turkish cultural conventions
- Indonesian: Complete Indonesian language interface with appropriate regional formatting and cultural considerations
- Pashto: Full Pashto language support with proper script rendering and Afghan/Pakistani cultural conventions
- Portuguese: Comprehensive Portuguese interface supporting both Brazilian and European variants
- Vietnamese: Complete Vietnamese language support including tone marks and Southeast Asian cultural formatting
- Chinese: Full Chinese interface support (may include both Simplified and Traditional variants)
- Romanian: Complete Romanian language support with proper diacritical marks and European conventions
- Lao: Full Lao language interface with proper script rendering and Laotian cultural formatting conventions
Language Impact on System Experience:
- Interface Translation: All menus, buttons, labels, and system messages appear in your selected language
- Date Format Adaptation: Date displays automatically adjust to cultural conventions (DD/MM/YYYY vs MM/DD/YYYY)
- Number Formatting: Decimal separators and thousand separators adjust to regional standards
- Currency Display: If applicable, currency symbols and formatting adapt to regional conventions
- Cultural Calendar Integration: Some languages may integrate alternative calendar systems alongside standard calendars
Professional Profile Photo Management:
Image Upload System and Requirements:
The profile photo feature creates visual recognition and professional presentation within the system, appearing in user directories, communication interfaces, and administrative screens.
Photo Upload Process:
- File Selection Method: Click the "Upload Image" button to open your device's file browser for image selection
- Selected images typically display in a preview area before final upload confirmation
Technical Specifications and Requirements:
- Maximum File Size: 5MB limit ensures reasonable upload times while maintaining image quality
- Supported Format Details:
- JPEG/JPG: Most common format, ideal for photographs with good compression and quality balance
- PNG: Excellent for images with transparency or sharp edges, larger file sizes but superior quality
- GIF: Basic support for simple graphics, though animated GIFs may not be supported
- WebP: Modern format offering excellent compression (if supported by system)
- Resolution Recommendations: Optimal dimensions typically range from 200x200 to 800x800 pixels for square images
- Quality Guidelines: High-resolution professional headshots work best, avoiding casual or inappropriate imagery
Extended Additional Information Management
Comprehensive Data Collection for Organizational Needs:
The "More Information" section accommodates organization-specific data requirements that extend beyond basic personal details, supporting business processes, compliance requirements, and administrative needs.
Organizational Data Categories:
Financial Information Management:
- Bank Details: May include account numbers, routing information, and payment preferences for payroll or expense reimbursement purposes
- Tax Information: Could encompass tax identification numbers, withholding preferences, and compliance documentation
- Emergency Fund Access: Some organizations maintain emergency contact financial information for urgent situations
Contact and Communication Preferences:
- Alternative Email Addresses: Secondary or personal email contacts for emergency communications
- Phone Numbers: Office, mobile, and emergency contact numbers with appropriate usage designations
- Physical Address: Work location, mailing address, or home address depending on organizational requirements
- Communication Preferences: Preferred methods and timing for various types of organizational communications
User and Role Management
The User and Role Management system allows administrators to control access permissions and create new user accounts. This is a two-step process:
Step 1: Create Roles → Step 2: Create Users
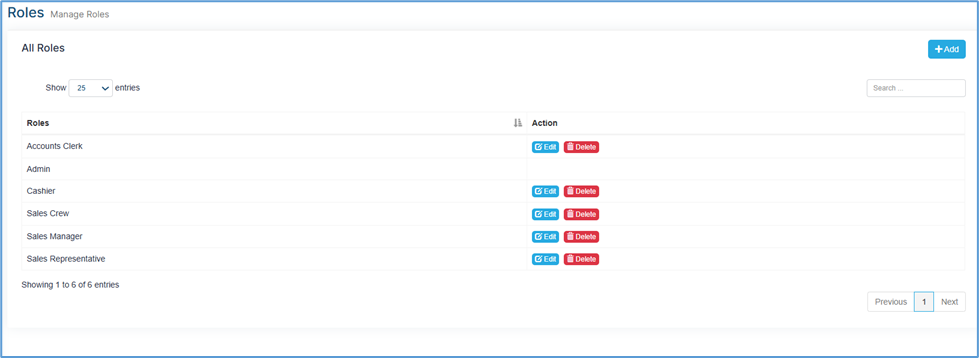
Creating Roles and Permissions
Accessing Role Management:
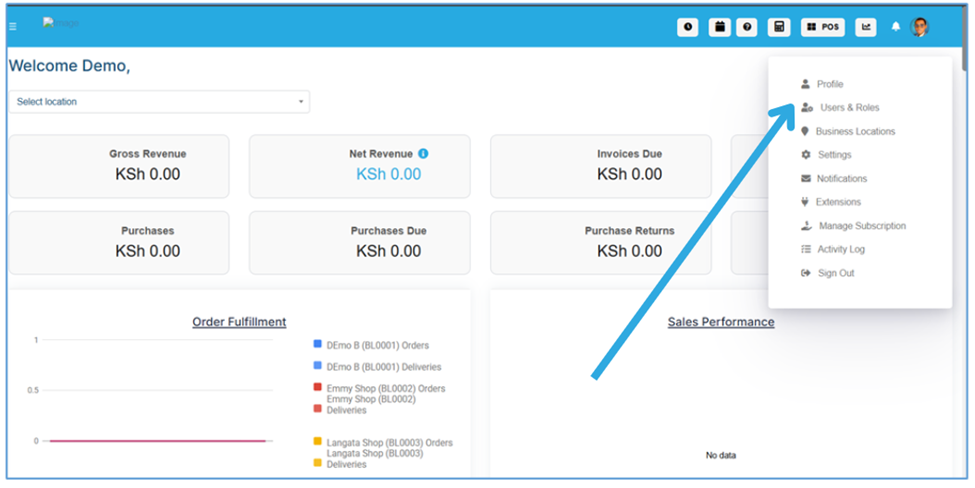
Step 1: Navigate to Users and Roles
- Click on "Users and Roles" in the main navigation menu
- This will display the user management dashboard
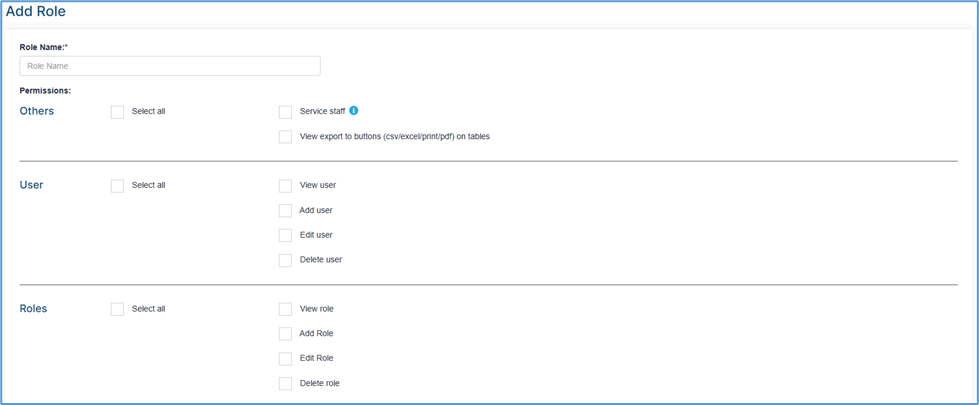
Step 2: Create New Role 3. Click on "Create Role" or "Add Role" button 4. Define the role parameters and assign necessary permissions
→ Important: Always create roles before creating users, as users must be assigned to existing roles.
Permission Assignment:
- Review available system permissions
- Select appropriate permissions based on the role requirements
- Consider principle of least privilege (give only necessary permissions)
Click add the following window will show up
Creating New Users
Once roles are established, you can create new user accounts.
Add User Process:
Step 1: Access User Creation
- From the Users and Roles section, click "Add User"
- The user creation form will open
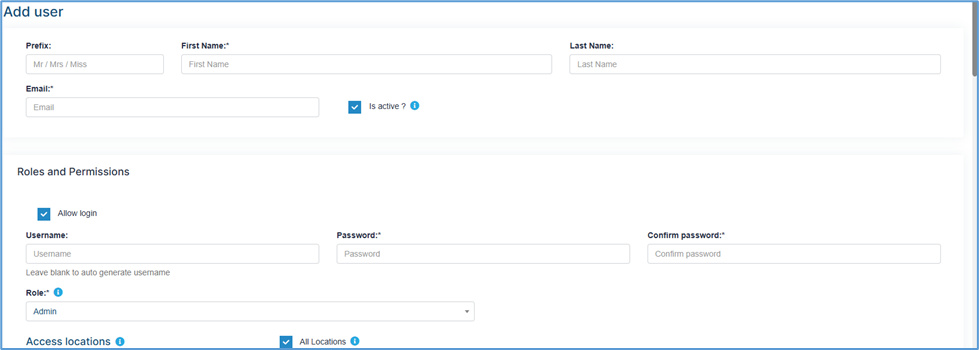
Step 2: Fill User Information
Complete the following fields:
Personal Information:
- Prefix: Select appropriate title
- First Name: (Required) Enter user's first name
- Last Name: Enter user's last name
- Email: (Required) Enter user's email address
Account Settings:
- Is Active: Toggle to enable/disable the user account
- Allow Login: Check this box to permit user login access
Authentication Details:
- Username: Leave blank to auto-generate, or enter custom username
- Password: (Required) Set initial password for the user
- Confirm Password: (Required) Re-enter password for verification
Role Assignment:
- Roles and Permissions: Select from previously created roles
Step 3: Additional Information Add relevant organizational data such as:
- Department information
- Employee ID
- Bank details (if required)
- Contact information
- Emergency contacts
Step 4: Save User 5. Click "Save" or "Create User" to complete the process 6. Verify the user appears in the user list
Managing Existing Users
Viewing All Users:
Step 1: Access User List
- Click on "Users" from the main menu
- Select "Manage Users" to view the complete user database

Step 2: User Management Interface
The "All Users" page displays:
Display Options:
- Show entries: Choose number of users to display (25, 50, 100, 200, 500, 1,000, or All)
- Search functionality: Filter users by various criteria
User Information Columns:
- Username: System login identifier
- Name: Full name of the user
- Role: Assigned role and permissions level
- Email: Contact email address
- Action: Available actions (Edit, Delete, Suspend, etc.)
Exporting User Data
Available Export Options
The system provides multiple export formats for user data management and reporting.
Export Methods:
Top Menu Export Options:
- 📄 Export to CSV: Download user data in comma-separated values format
- 📊 Export to Excel: Generate Excel spreadsheet with user information
- 🖨️ Print: Print user list directly from browser
- 👁️ Column Visibility: Toggle which columns to display/export
- 📄 Export to PDF: Create PDF document of user data
Business Location Management
Understanding Business Location Configuration
Business location management is a critical system component that allows organizations to establish multiple operational sites, branches, or service centers within a single system framework. This functionality supports multi-location businesses by providing location-specific settings, invoicing configurations, payment options, and operational parameters that can be customized for each individual business site.
Accessing Business Location Settings
The business location management interface provides comprehensive tools for adding, editing, and managing all your organization's physical or operational locations. Each location can maintain unique settings for invoicing, payment processing, contact information, and operational parameters while remaining connected to your central system administration.
Step 1: Navigate to Business Location Management
Begin the business location setup process by accessing the profile menu and selecting the appropriate business management option.
- Access Profile Menu: Click on the Profile Icon located in the top-right corner of your system interface
- Locate Business Options: From the expanded dropdown menu, identify and click on "Business Locations"
- Enter Management Interface: The system will redirect you to the comprehensive business location management dashboard
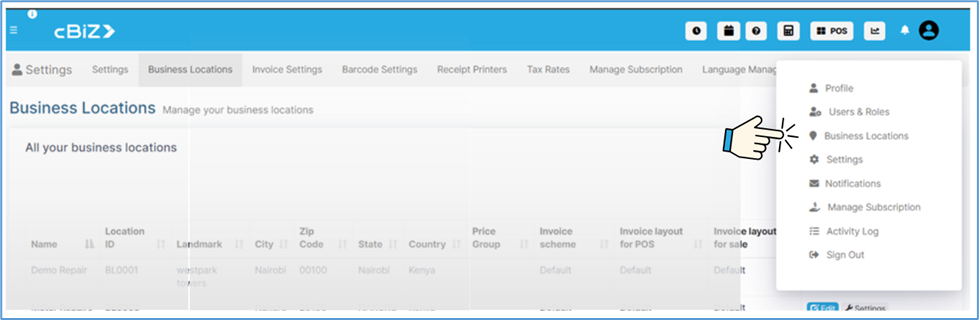
→ This navigation process takes you to the main business location management interface where you can view existing locations and add new business sites.
Step 2: Review Existing Business Locations
The business location management dashboard displays all currently configured locations in a comprehensive table format, providing essential information about each site.
Location Overview Display:
The main interface shows your business locations with the following information columns:
- Name: Business location identifier and display name
- Location ID: Unique system identifier for each location
- Landmark: Geographic reference points for location identification
- City: Municipal location for each business site
- Postal Code: Postal code for precise location identification
- County : Regional or provincial location information
- Country: National location designation
- Price Group: Pricing structure associated with the location
- Invoice Scheme: Billing format configuration for the location
- Invoice Layout for POS: Point-of-sale invoice formatting
- Invoice Layout for Sale: Sales transaction invoice formatting
- Action: Available management functions (Edit, Settings, Deactivate Location)
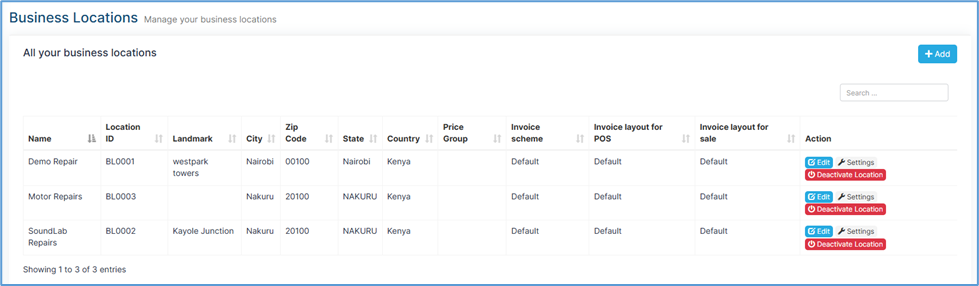
Location Management Actions:
Each location entry provides specific action buttons:
- Edit Button (Blue): Modify location details and configuration
- Settings Option: Access location-specific operational parameters
- Deactivate Location (Red): Temporarily disable or permanently remove locations
Adding New Business Locations
Adding new business locations requires detailed information input to ensure proper system integration, accurate invoicing, payment processing configuration, and operational functionality across all your business sites.
Step 1: Initiate New Location Creation
- Locate Add Function: In the business locations interface, find the "+ Add" button positioned in the upper-right area of the screen
- Click Add Button: Single-click the "+ Add" button to open the new business location creation form
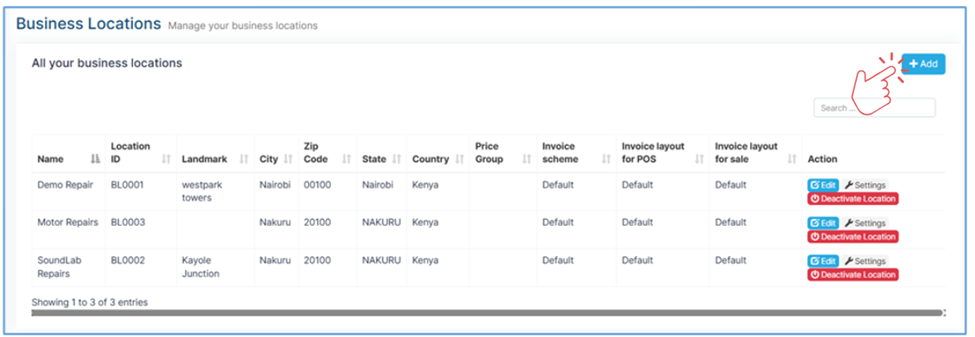
→ This action opens the comprehensive "Add a new business location" dialog window with multiple sections for complete location configuration.
Step 2: Complete Essential Location Information
The new business location form is organized into several categories of information that must be completed for proper system integration and operational functionality.
Primary Location Identification:
Business Name Entry:
Name* – This required field serves as the primary identifier for your business location within the system. It is used extensively across reports, invoices, user interfaces, and administrative functions, making accuracy and clarity essential. To ensure consistency, use clear and descriptive names that distinguish this location from others in your organization. Avoid using special characters, as they may interfere with system integrations or data processing. Adhering to these best practices will help maintain reliable records and seamless functionality across business operations.
Location ID Configuration:
Location ID – Although optional, this field is highly recommended as it creates a unique system identifier for internal tracking and integration. Typically formatted as alphanumeric codes (e.g., BL001, NYC-001, STORE-DOWNTOWN), it provides a standardized way to reference locations across different modules. Using a consistent Location ID facilitates smoother system administration, improves reporting accuracy, and supports location-specific operations. While the field can be left empty for the system to auto-generate an identifier, assigning a meaningful code upfront ensures easier management and long-term scalability.
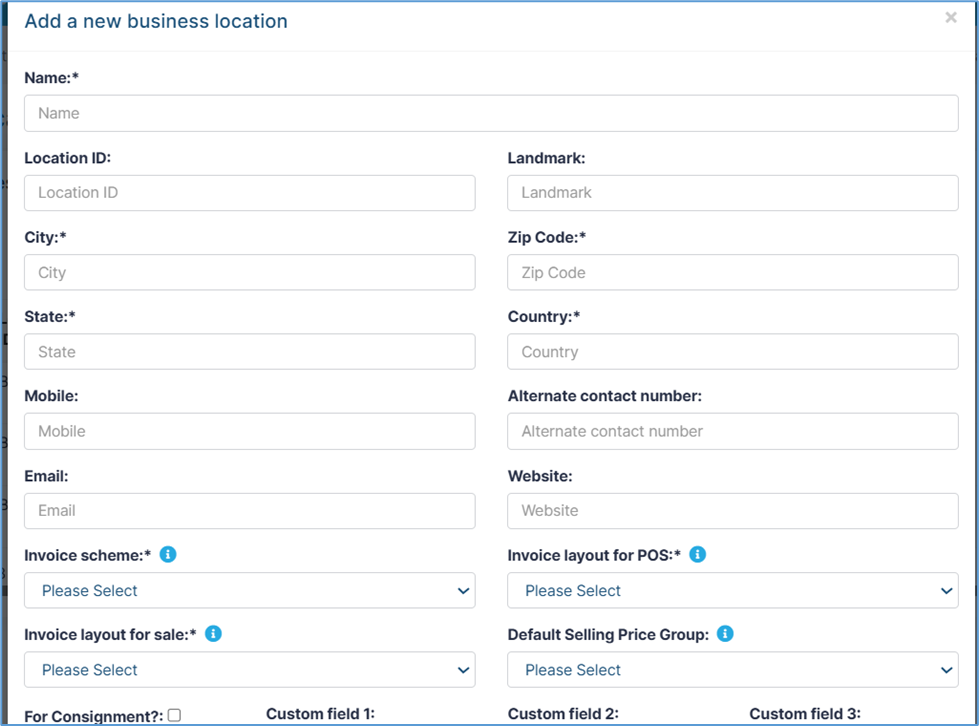
Geographic and Contact Information
Physical Address Components:
Field: Landmark (Optional) – This field provides a geographic reference point that makes identifying and reaching the business location easier. Examples include “Near Central Mall,” “Opposite City Hospital,” or “Next to Main Post Office.” Including a landmark is particularly helpful for customers, delivery personnel, and staff, especially in areas where addressing systems are complex or unclear.
Field: City* – This required field establishes the municipal jurisdiction and operational context of the business. It must align with official municipal records to ensure accuracy in legal, tax, and regulatory matters. The city designation directly affects tax calculations, regulatory compliance, and the determination of service areas.
Field: Postal Code* – A required field that provides precise geographic identification for deliveries, services, and system calculations. It must follow the local postal code format to ensure proper validation and accuracy. The zip code is also used in system integrations for tax computations, shipping zones, and service area determinations.
Field: county* – This required field identifies the county in which the business operates, establishing regional jurisdiction and compliance context. Accurate entry is critical, as it determines applicable state or provincial tax rates, licensing requirements, and regulatory obligations that directly affect operations.
Field: Country* – A required field that specifies the national jurisdiction of the business location. It influences international operational contexts, including currency settings, cross-border transactions, and applicable national laws or business regulations. Correct country designation is essential for both compliance and system-wide integrations.
Field: Mobile (Optional but recommended) – Provides a direct communication channel for inquiries related to a specific business location. The number should include a country code to ensure international accessibility. This contact is often used for emergency purposes, delivery coordination, or customer service needs.
Field: Alternate Contact Number (Optional) – Offers a backup communication line to ensure redundancy and accessibility. It may be used for departmental contacts, after-hours support, or when the primary number is unavailable. Including an alternate contact enhances reliability and customer satisfaction.
Field: Email (Optional but recommended) – Enables digital communication for location-specific correspondence. Best practices recommend using a location-based email address for clarity and consistency. This field may also integrate with system features for automated notifications, alerts, or customer communications.
Field: Website (Optional) – Provides an online presence reference specific to the business location. The entry should be a complete URL, including the protocol (e.g., https://). Linking a website supports marketing efforts, enhances customer information access, and may integrate with digital campaigns or service portals.
Advanced Configuration Settings
Invoice and Billing Configuration:
Field: Invoice Scheme* – This required field determines the billing format and numbering system used at the location. Selected from a dropdown menu of pre-configured options, the chosen scheme directly impacts invoice appearance, numbering sequences, and compliance with local or industry regulations. Customization may also include location-specific invoice templates and formatting, ensuring both consistency and legal adherence.
Field: Invoice Layout for POS* – A required field that configures the receipt and invoice format for point-of-sale transactions. Multiple layout templates are available, optimized for different business types. The selected layout should align with local customer expectations while meeting applicable regulatory requirements to ensure professional presentation and compliance.
Field: Invoice Layout for Sale* – This required field defines the formatting of invoices for regular sales transactions. Unlike POS layouts, these templates may differ to reflect the needs of standard invoicing processes. The chosen layout influences how customers perceive the professionalism of the business and ensures consistency in documentation.
Field: Default Selling Price Group (Optional) – Establishes the default pricing structure for products at this specific location. It provides flexibility for implementing location-specific pricing strategies, which can impact product pricing, promotional campaigns, and overall profit margins. Configuring this field helps businesses maintain competitive and adaptive pricing.
Field: For Consignment (Checkbox) – When enabled, this option activates consignment functionality for the location, supporting business models where products are sold on behalf of other parties. This has a direct accounting impact, as it influences inventory tracking, ownership, and revenue recognition processes.
Fields: Custom Field 1, Custom Field 2, Custom Field 3 – These optional fields provide flexibility for organization-specific data requirements, such as department codes, manager names, or special classifications. They can be customized according to business needs and later incorporated into reporting and analytics for tailored insights.
👉 Note: All invoice-related configurations, including schemes and layouts, can be adjusted under the system’s Invoice Settings to ensure proper alignment with business and regulatory requirements.
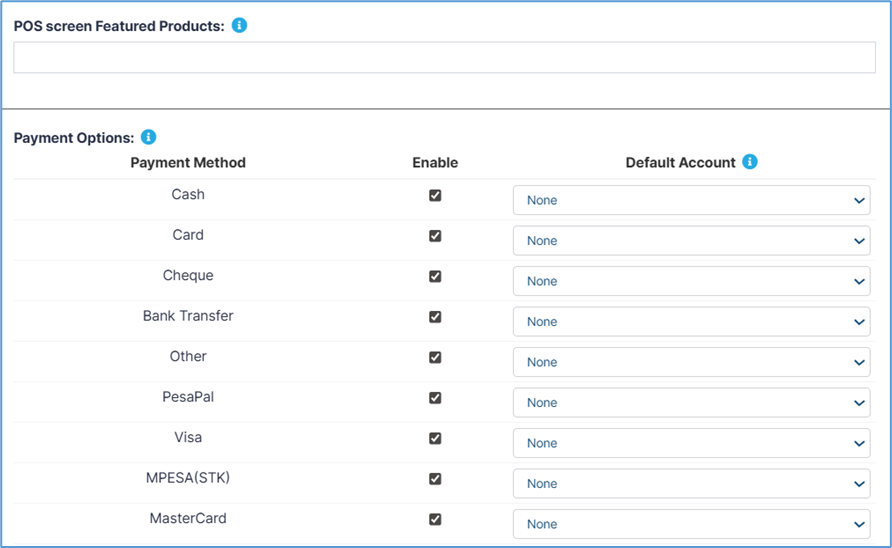
Advanced Features and Payment Configuration:
Point-of-Sale Featured Products:
POS Screen Featured Products Configuration – This setting allows businesses to designate specific products as featured or promoted items for display on point-of-sale (POS) screens. Products selected here appear prominently within the POS interface, ensuring quick access for staff and greater visibility for customers. By strategically highlighting certain items, businesses can support marketing initiatives, encourage upselling, and drive targeted inventory movement. The configuration is fully customizable and can be adjusted at any time to align with seasonal promotions, new product launches, or changing business priorities.
Comprehensive Payment Options Management
The payment options section provides detailed control over accepted payment methods and their associated system configurations for each business location.
Payment Method Configuration:
Cash Transactions:
- Enable Status: Checkbox to activate/deactivate cash payment acceptance
- Default Account: Dropdown to specify the accounting system integration for cash transactions
- Considerations: May include cash handling procedures and security protocols
Card Payment Processing:
- Enable Status: Checkbox for credit/debit card acceptance activation
- Default Account: Accounting system integration specification for card transactions
- Processing Integration: May connect to payment processing services and merchant accounts
Check Payment Handling:
- Enable Status: Checkbox to accept check payments
- Default Account: Specifies accounting treatment for check transactions
- Verification Procedures: May include check verification and fraud prevention measures
Bank Transfer Capabilities:
- Enable Status: Checkbox for direct bank transfer acceptance
- Default Account: Accounting integration for bank transfer processing
- International Considerations: May support various international banking systems
Alternative Payment Methods:
- Other: Generic category for miscellaneous payment types
- PesaPal: East African mobile payment system integration
- Visa: Specific Visa card processing configuration
- MPESA(STK): Kenyan mobile money system integration
- MasterCard: Specific MasterCard processing configuration
Payment Configuration Benefits:
- Flexibility: Each location can accept different payment methods based on local preferences
- Accounting Integration: Ensures proper financial tracking and reporting
- Customer Convenience: Supports diverse customer payment preferences
- Regional Adaptation: Accommodates local and regional payment system preferences
Step 3: Save and Activate New Business Location
After completing all required fields and configuring optional settings according to your business needs:
- Review Information: Double-check all entered information for accuracy and completeness
- Submit Configuration: Click the "Save" or "Create Location" button to establish the new business location
- Confirmation: Wait for system confirmation that the location has been successfully created
- Verification: Return to the business locations list to verify the new location appears with correct information
→ The new business location will now be available throughout the system for transaction processing, reporting, and administrative functions.
Business Settings Configuration
Business settings form the operational foundation of your system, controlling core business parameters, financial configurations, tax management, product settings, and sales processes. These settings directly impact daily operations, financial reporting, compliance requirements, and overall system functionality across all business locations and user activities.
Accessing Business Settings Interface
The business settings management system provides centralized control over critical operational parameters that affect every aspect of your business operations, from basic company information to complex tax calculations and sales commission structures.
Step 1: Navigate to Business Settings
Begin by accessing the profile menu to locate the business settings configuration area.
1.Click the Profile Icon in the top navigation bar and from the dropdown menu, click on "Settings" to access the main settings dashboard. The system will display the business settings interface with multiple configuration categories
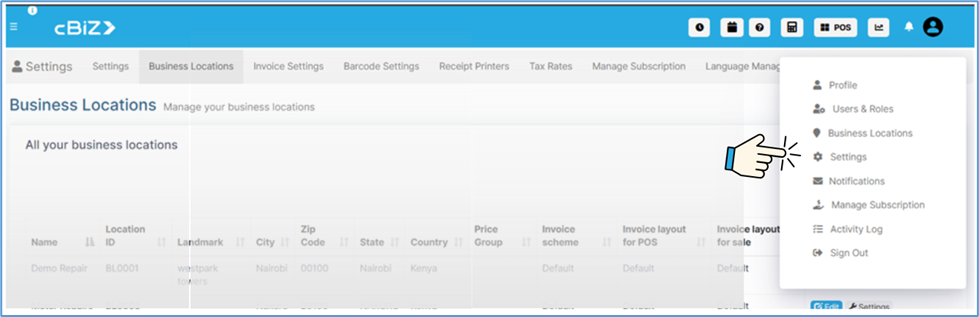
→ This navigation takes you to the comprehensive business settings dashboard with multiple configuration categories accessible through the left sidebar navigation.
Core Business Information Configuration
Essential Business Identity Settings
The business information section establishes your organization's fundamental operational parameters, including company identification, financial year settings, currency configurations, and basic operational preferences that affect system-wide functionality.
Step 2: Configure Primary Business Details
The business settings interface presents multiple configuration categories through a left-side navigation menu, with the main content area displaying detailed settings for each selected category.
Business Identity and Basic Information:
Field: Business Name* – This required field sets your company’s official name within the system. For example, the default “Demo Repair” can be replaced with your registered business name. The entry is critical, as it appears across invoices, reports, correspondence, and all system-generated documentation. For compliance and legal accuracy, the name should match your officially registered business entity.
Field: Start Date – This field uses a date picker (e.g., “03/11/2026” in the example) to establish the official commencement date of business operations. The start date impacts reporting timelines, financial year calculations, and historical data analysis. It may also be required for regulatory filings, business registration, and tax compliance.
Field: Default Profit Percent – This configuration sets a default markup percentage (e.g., “25.00”) for pricing calculations across the system. It directly influences product pricing, profit margin assessments, and long-term financial projections. While this setting provides a standard baseline, it can be overridden for individual products or specific transactions, giving flexibility to adapt pricing strategies as needed.
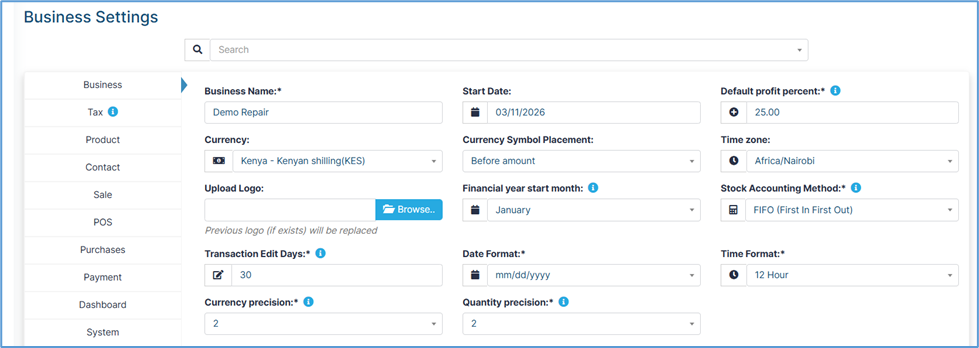
Field: Currency* – Configured through a dropdown menu, this field establishes the primary currency for all financial transactions. For example, “Kenya – Kenyan Shilling (KES)” ensures accurate pricing display, financial reporting, and transaction processing. Currency selection also determines symbols, decimal places, and formatting standards for both local and international operations.
Field: Currency Symbol Placement – This option controls how currency symbols appear in system pricing and reports, such as “Before amount.” Settings should align with regional currency display conventions to avoid confusion and provide a clear user experience for both staff and customers.
Field: Upload Logo – This section allows businesses to upload a company logo via the “Browse” button, replacing any previous image. Accepted formats include JPG and PNG, with appropriate resolution for professional display. The uploaded logo is applied across invoices, reports, and interfaces, ensuring brand consistency and enhancing the professional appearance of documentation.
Field: Financial Year Start Month – Configured through a dropdown (e.g., “January”), this field defines the start of the financial year for reporting and compliance purposes. It directly affects accounting cycles, tax calculations, and financial reporting periods, and must align with tax authority and registration requirements.
Field: Stock Accounting Method – This field determines how inventory costs are calculated and reported. Options include FIFO (First In First Out), LIFO, and Average Cost, with the current setting often defaulting to FIFO. The choice impacts cost of goods sold (COGS), inventory valuation, and overall financial performance reporting.
Field: Time Zone – Selected from a dropdown (e.g., “Africa/Nairobi”), this field sets the system time zone for all operations. Time zone configuration ensures accurate transaction timestamps, scheduled task execution, and reporting alignment, particularly important for multi-location businesses.
Field: Date Format* – A required field that controls how dates are displayed across the system (e.g., “mm/dd/yyyy”). Settings should match regional standards to minimize misinterpretation and ensure consistency in reporting and data entry.
Field: Time Format* – This required field configures whether the system uses 12-hour or 24-hour time (e.g., “12 Hour” format). Selection should reflect local standards to improve readability, scheduling accuracy, and user familiarity.
Field: Transaction Edit Days – This field defines the time window (e.g., “30” days) during which users can edit transactions after creation. Restricting edit days enhances data security, ensures audit trail accuracy, and supports compliance with financial integrity requirements.
Field: Currency Precision – Configurable with an information icon, this setting defines the number of decimal places used in financial calculations (e.g., “2” decimal places). It affects pricing accuracy, reporting precision, and alignment with local currency standards.
Field: Quantity Precision – This setting specifies the decimal precision for quantity entries (e.g., “2” decimal places). It ensures accuracy in inventory tracking, sales calculations, and measurement reporting, and should reflect the requirements of the specific industry or business model.
Tax Configuration and Management
Comprehensive Tax System Setup
Tax management represents one of the most critical aspects of business settings, ensuring compliance with local, regional, and national tax regulations while maintaining accurate financial records and proper tax calculations across all transactions.
Step 3: Configure Tax Settings
Access the tax configuration section through the left navigation menu to establish comprehensive tax management parameters.
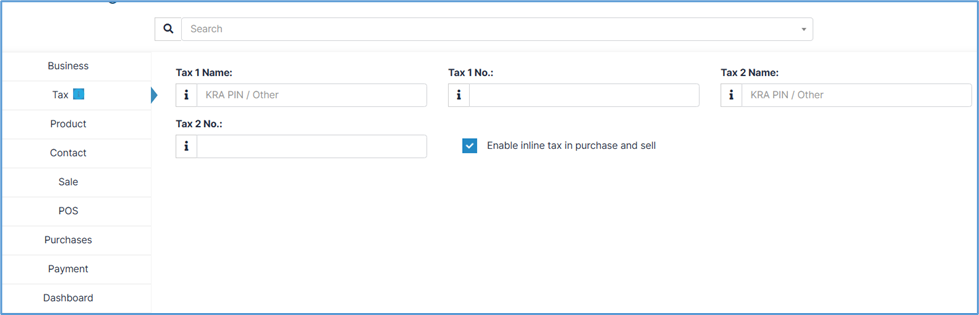
- Select Tax Category: Click on "Tax" in the left sidebar navigation menu
- Review Tax Configuration: The main content area will display comprehensive tax setup options
Multi-Tax System Configuration:
The tax system supports multiple concurrent tax types, allowing businesses to comply with complex tax structures that may include value-added tax, sales tax, service tax, and other regulatory requirements.
Field: Tax 1 Name – This field establishes the primary tax identification and calculation method, with an information icon providing additional guidance. For example, placeholders like “KRA PIN / Other” may be used. The entry must align with official tax authority designations to ensure compliance and accurate system integration with tax reporting functions.
Field: Tax 1 No. – This field records the official tax registration number tied to the primary tax setup. The number must match official tax authority records to satisfy legal requirements and maintain a valid audit trail. Proper entry is critical for regulatory compliance and supports businesses that operate under strict tax reporting frameworks.
Field: Tax 2 Name – Provides flexibility for configuring a secondary tax structure, with placeholders such as “KRA PIN / Other.” This field allows businesses to accommodate additional tax types or jurisdictions, supporting multi-tax operations and complex compliance obligations.
Field: Tax 2 No. – This field captures the registration number associated with the secondary tax configuration. It is essential for multi-tax compliance, ensuring businesses meet obligations across different authorities and jurisdictions while maintaining complete audit coverage.
Checkbox: Enable Inline Tax in Purchase and Sell – When selected, this option activates automated tax calculations during both purchase and sales transactions. Inline tax processing eliminates manual calculation errors, improves efficiency, and ensures accurate, consistent tax application. This automation also strengthens compliance by maintaining complete and accurate tax records for all transactions.
Product Management Configuration
Advanced Product Settings and Control
Product management settings control how products are handled throughout the system, affecting inventory management, pricing structures, categorization systems, and operational workflows that impact daily business operations.
Step 4: Access Product Configuration Settings
Navigate to the product settings section to configure comprehensive product management parameters.
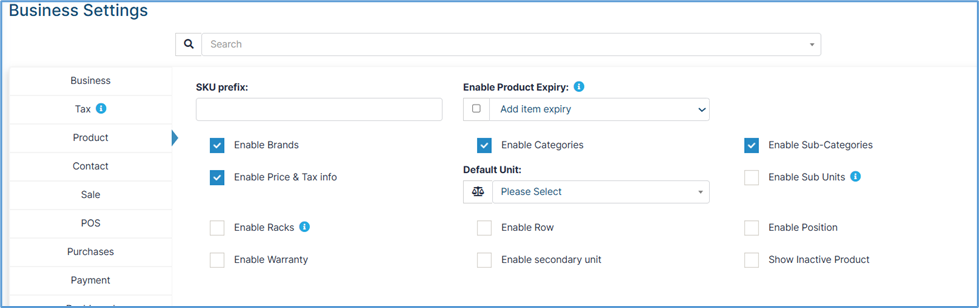
- Select Product Category: Click on "Product" in the left sidebar navigation menu
- Review Product Options: The main content area displays extensive product configuration options
Product Identification and Tracking:
Field: SKU Prefix – This text input field establishes standardized product identification codes for inventory tracking. For example, entering a prefix such as “200” will generate product codes beginning with this sequence (e.g., 200-001, 200-002). Using a consistent SKU prefix improves product identification, streamlines ordering processes, and enhances overall inventory management. The prefix also integrates with barcode systems and inventory management modules for seamless product tracking and automation.
Field: Enable Product Expiry – A dropdown option (e.g., “Add Item Expiry”) that activates expiration date tracking for perishable or time-sensitive products. This setting is critical for compliance in food, pharmaceutical, and other regulated industries. Enabling product expiry ensures safety by preventing the sale of expired goods and maintaining quality standards.
Checkbox: Enable Brands – When activated, this feature allows products to be organized and filtered by brand. It supports brand-based promotions, improves customer searchability, and enables brand-specific sales reporting and analytics. This enhances marketing strategies while improving the customer experience.
Checkbox: Enable Categories – Activates a hierarchical product organization system, allowing products to be grouped into categories. This improves navigation, customer browsing, and inventory management while supporting scalability for businesses with wide product ranges.
Checkbox: Enable Sub-Categories – Adds an additional layer of product classification for more granular control. Essential for businesses with extensive product inventories, this feature improves staff efficiency, enhances customer navigation, and enables detailed reporting.
Checkbox: Enable Price & Tax Info – When checked, this option displays comprehensive pricing and tax details on products. It ensures transparency for customers, compliance with tax regulations, and maintains accuracy in financial calculations.
Field: Default Unit – A dropdown menu (e.g., “Please Select”) that establishes standard measurement units for products. This ensures consistency in product quantity tracking and supports international standards, accommodating both metric and imperial units as well as industry-specific requirements.
Checkbox: Enable Sub Units – Provides advanced unit management by allowing products to be sold in multiple unit configurations. This feature enables automatic unit conversions, ensuring flexibility for businesses handling complex product packaging and measurement needs.
Checkbox: Enable Racks – Activates warehouse storage management features by tracking inventory through designated rack locations. This improves organization, speeds up picking and packing, and is essential for businesses with large-scale inventory operations.
Checkbox: Enable Row – When enabled, adds row-based tracking for more detailed warehouse location management. Particularly useful in large warehouses, it reduces search times and increases operational efficiency.
Checkbox: Enable Position – Provides the most detailed inventory tracking by recording product positions within rows and racks. This level of precision supports complex warehouse operations and integrates with advanced logistics systems.
Checkbox: Enable Warranty – Activates warranty period tracking for products. This supports warranty claims, enhances customer service, and ensures compliance with legal warranty obligations, strengthening post-sale customer support.
Checkbox: Enable Secondary Unit – Allows products to be defined with alternative unit measurements. This supports flexible sales configurations, ensures accurate inventory conversion tracking, and provides customers with more purchasing options.
Checkbox: Show Inactive Product – Controls the visibility of discontinued or inactive products in the system. While inactive items remain in historical records for reporting, this feature helps maintain a clean product catalog, reduces interface clutter, and improves system performance.
Contact and Customer Management
Customer Relationship and Credit Management
Contact management settings establish the framework for customer relationships, credit policies, and customer service operations that directly impact sales processes and customer satisfaction.
Step 5: Configure Contact Management Settings
Access the contact configuration section to establish customer and vendor management parameters.
- Select Contact Category: Click on "Contact" in the left sidebar navigation menu
- Review Contact Options: The main content area displays customer management configuration
Credit Management System:
Default Credit Policies:
- Field: Default credit limit text input field
- Purpose: Establishes standard credit limits for new customer accounts
- Risk Management: Controls financial exposure and payment risks
- Customer Onboarding: Streamlines new customer account setup processes
- Financial Control: Maintains consistent credit policies across customer base

Sales Configuration and Commission Management
Sales settings control the fundamental aspects of sales operations, including discount policies, tax handling, commission structures, and payment processing that directly impact revenue generation and sales team performance.
Step 6: Access Sales Configuration
Navigate to the sales settings section to configure comprehensive sales management parameters.
- Select Sale Category: Click on "Sale" in the left sidebar navigation menu
- Review Sales Options: The main content area displays extensive sales configuration options
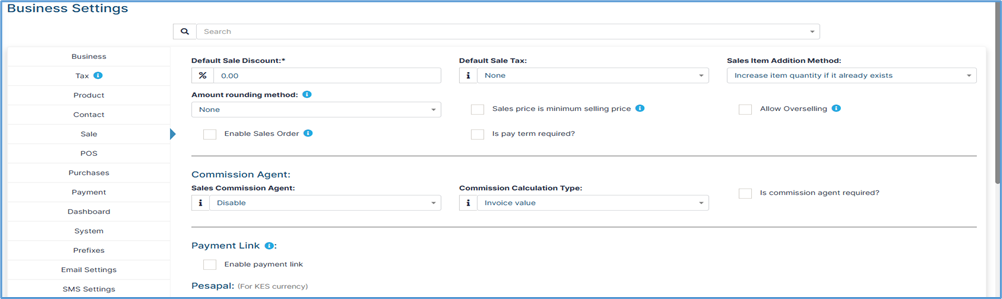
Sales Pricing and Discount Management:
- Default Sale Discount (%) – Sets a standard discount rate for sales transactions. This ensures consistent pricing, supports promotional strategies, and controls revenue impact by maintaining predictable margins.
- Default Sale Tax (dropdown) – Defines the default tax applied to sales. Automates tax handling, reduces manual errors, and ensures compliance with regulatory requirements.
- Amount Rounding Method (dropdown) – Controls how monetary values are rounded (up, down, nearest). Promotes accuracy in financial records and ensures compliance with accounting standards.
- Enable Sales Order – Activates sales order management for businesses. Enables quote-to-order workflows, improves customer service, and supports advanced B2B sales cycles.
- Sales Price is Minimum Selling Price – Prevents sales below the defined minimum price. Protects margins, enforces revenue discipline, and maintains premium pricing strategies.
- Is Pay Term Required? – Determines whether payment terms must be specified per sale. Enhances credit management, clarifies customer expectations, and strengthens receivables control.
- Field: Sales Item Addition Method (dropdown) – Sets how duplicate items are handled (consolidate vs. separate lines). Improves sales entry efficiency, maintains invoice clarity, and supports accurate inventory tracking.
- Checkbox: Allow Overselling – Allows sales of items beyond available stock. Provides flexibility for made-to-order businesses, but requires careful inventory and fulfillment management.
- Field: Sales Commission Agent (dropdown) – Manages sales commission tracking. Supports commission-based teams, enables accurate reporting, and aligns compensation with performance.
- Commission Calculation Type (dropdown) – Determines how commissions are calculated (invoice value, margin, etc.). Shapes compensation structures, influences sales behavior, and aligns incentives with business goals.
- Is Commission Agent Required? – Specifies if each sale must be linked to an agent. Ensures accurate commission allocation, performance tracking, and prevents reporting gaps.
Note: Our developers will assist with payment configuration to ensure smooth setup and integration.
- Checkbox: Enable Payment Link – Activates online payment capabilities. Simplifies collections, improves cash flow, and supports digital-first customer experiences.
- Field: Payment Options (M-Pesa, Bank, Pesapal Integration) – Enables flexible payment methods including mobile money, direct bank transfers, and Pesapal for KES transactions. Expands customer choice, supports regional commerce, and ensures faster settlement.